MX-1 and MX-P Firmware update

This guide is intended for advanced users only. You will need administrator level permissions on your system to continue.

This process is only possible on a Windows 10 or 11 machine at this time.
This guide will show you how to update the firmware of your device. For Windows users this update should allow you to continue to use your ELMO on your Windows computer. To update your device, you will need the following items:
● MX-1 or MX-P Device
● USB 2.0 or 3.0 Cable
● Firmware file
● Firmware tool
● Pick, tweezers, or similar tool to reach a small switch.
DOWNLOADS:
● (Firmware tool) Infineon EZ-USB™ FX3 Software Development Kit - https://www.infineon.com/design-resources/development-tools/sdk/usb-controllers-sdk/ez-usb-fx3-software-development-kit?utm_source=cypress&utm_medium=referral&utm_campaign=202110_globe_en_all_integration-software&redirId=SD1
● (Firmware tool) Infineon EZ-USB™ FX3 Software Development Kit - https://www.infineon.com/design-resources/development-tools/sdk/usb-controllers-sdk/ez-usb-fx3-software-development-kit?utm_source=cypress&utm_medium=referral&utm_campaign=202110_globe_en_all_integration-software&redirId=SD1

Account creation and login is required to download the above installer. Alternative download links and preregistered login credentials are not available.
● MX-1 Firmware - https://drive.google.com/file/d/1Xyk1dGCnlVAv2Hm5DK9AjmU8RP1dJgoW/view?usp=sharing
● MX-P Firmware - https://drive.google.com/file/d/1V96lh8t0AfNXbVudnZLH6An7o0EirkOa/view?usp=sharing
1. Download and install the EZ-USB™ FX3 Software Development Kit. You will be asked to create an account to download. Please make a note of the installation folder location for later.
This guide will assume you are using version 1.3.5 of the EZ-USB SDK. Future releases should continue to work fine, but are not recommended.
2. Set your MX device into firmware rewriting mode. With the ELMO's out ports facing you and its operating panel facing upward, use a pick, tweezers, or similar tool to reach the mode switch and set it to the LEFT. Be careful not to apply too much force or the switch could break. You will feel a slight click when the switch is in position.
On the MX-1, the switch is located above the Expansion port. Move the expansion cover over to access the Expansion port, and then move the cover back to access the USB port again.
On the MX-P, the switch is located above the HDMI Out port.
3. Connect your MX to your computer. Open Device Manager on your computer and find the ELMO. Because it is in rewriting mode, it will appear as a 'Unknown device' or 'West Bridge'.

If you are unsure which listing is the ELMO, you can unplug and plug it back in with Device Manager open to compare for new listings.
If your ELMO appears normally named like the photo below, you are not in rewrite mode. Please see step 2 again.
4. Right click the device listing, and choose Update Driver.
5. Select 'Browse my computer for drivers'. Then 'Browse..'
6. You now need to navigate to your EZ-USB™ FX3 Software Development Kit installation directory. Single click the 'x64' folder under Win11 or Win10 (depending on your if your computer is running Windows 10 or 11) and press OK.
The default location is C:\Program Files (x86)\Cypress\EZ-USB FX3 SDK\1.3\driver\bin\Win1*\x64
7. Finish installing the driver. If your device is now named "Cypress FX3 USB BootLoader Device" then the driver installed properly. If not, please unplug the ELMO and try again.
8. On your computer find and run the USB "Control Center" application. This is automatically installed as part of the EZ-USB™ FX3 Software Development Kit.
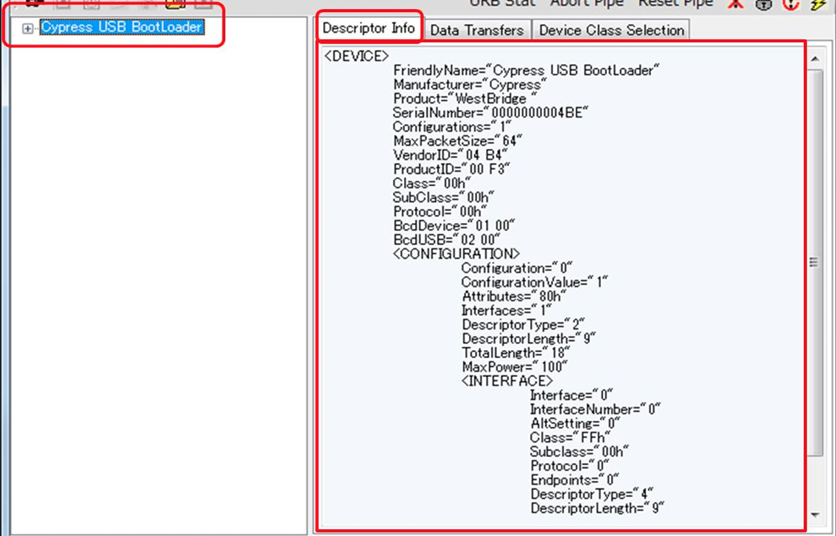
9. Confirm the ELMO is listed as a device on the left and click it once. It should appear as 'Cypress USB BootLoader' and provide device info when selected.
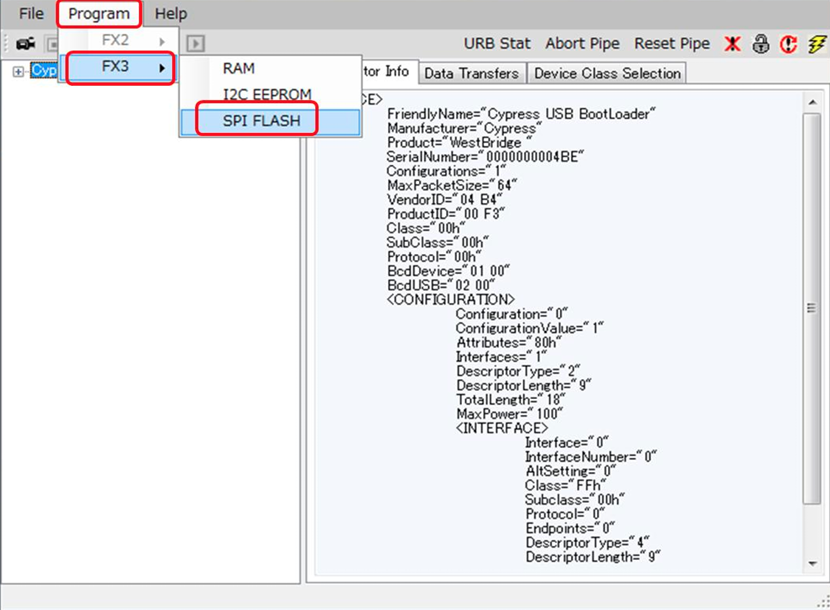
On the top of the 'Control Center' press the Program button -> FX3 -> SPI FLASH.

If no devices are listed or if the programming options are greyed out, please double check your driver setup in step 3 and 4.
10. When prompted select the firmware file for your device. Download links are at the top of this guide.

11. Wait for the install to finish. Progress is noted on the bottom of the app.
Do not power off your computer, unplug your ELMO, or close the app while the update is in progress. This can potentially harm your ELMO.
12. Once programming is completed, disconnect your ELMO from your computer and flip the switch in step 2 back over for normal use.
NOTE: This firmware update should not reset any settings on the device or delete any data. If you run into any issues, please contact ELMO Support https://support.elmousa.com/portal/en/newticket
Related Articles
MX-1 and MX-P camera not connecting to Windows computers
We have recently been made aware that an update pushed by Microsoft to some Windows computers may be causing connection and driver problems with MX-1 and MX-P cameras. Affected Windows builds include those released in late December 2024 and January ...MX-P Product Support
Having trouble setting up your MX-P document camera? Use this article to troubleshoot common issues and get answers to your questions! Troubleshooting Problem: Camera not recognized / No image from camera Solution: Change cable and/or input port. ...MX-P3 Connection Problems After Computer Reboot
Some versions of MX-P3 firmware have a bug where the camera will stop functioning after a computer reboot, or if the camera is plugged in before the computer is powered on. While this problem can be fixed by unplugging and plugging back in the ELMO, ...MX-1 Product Support
Having trouble setting up your MX-1 document camera? Use this article to troubleshoot common issues and get answers to your questions! Troubleshooting Problem: Camera not recognized / No image from camera Solution: Change cable and/or input port. ...PX-30E Firmware update
This guide is intended for advanced users only. This guide will show you how to update the firmware of your device. Photos in this guide are of the PX-30E, but the process is the same across all PX series devices. To update your device, you will need ...